5.接ESXI物理服务器的两个网卡要调trunk模式
6.VKenel里面的网卡是怎么通讯的
7.挂载存储的时候网卡怎么选择
- VMware ESXI的常用命令
如果VMware ESXI密码输错多次导致root锁定了,可以用以下密令reset锁定状态
pam_tally2 --user root #查询锁定状态

pam_tally2 --user root --reset #重置锁定状态
如果没有启用SSH,无法使用命令,密码忘记或者用户锁定
可以选择之前安装ESXI的ISO文件,重新安装ESXI,安装选择“Install ESXi and preserve VMFS datastore”,这样只会删除VMware ESXI的配置信息,如网络IP,而不会删除数据影响其他。
VMware Supported Option: Reinstall ESXi.
This is the official method recommended by VMware.
Boot from the ESXi installation media (ISO, USB, etc.).
During the installation process, select the option to "Install ESXi and preserve VMFS datastore". This reinstalls the hypervisor configuration but keeps your virtual machine data intact.
After reinstallation, you will be prompted to set a new root password and network settings. You will then need to re-register the VMs from the datastore into the inventory.
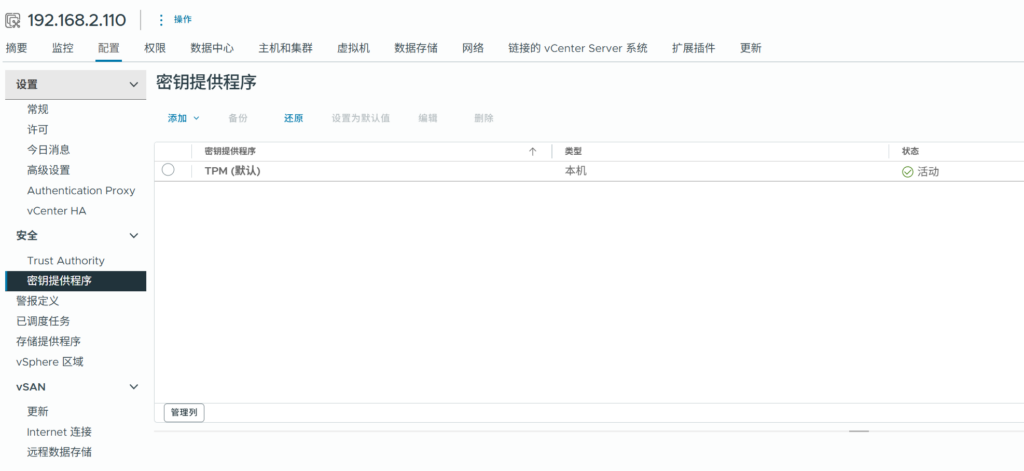
- VCenter 密钥出现备份失败问题。
如果Vcenter一直提示密钥备份失败
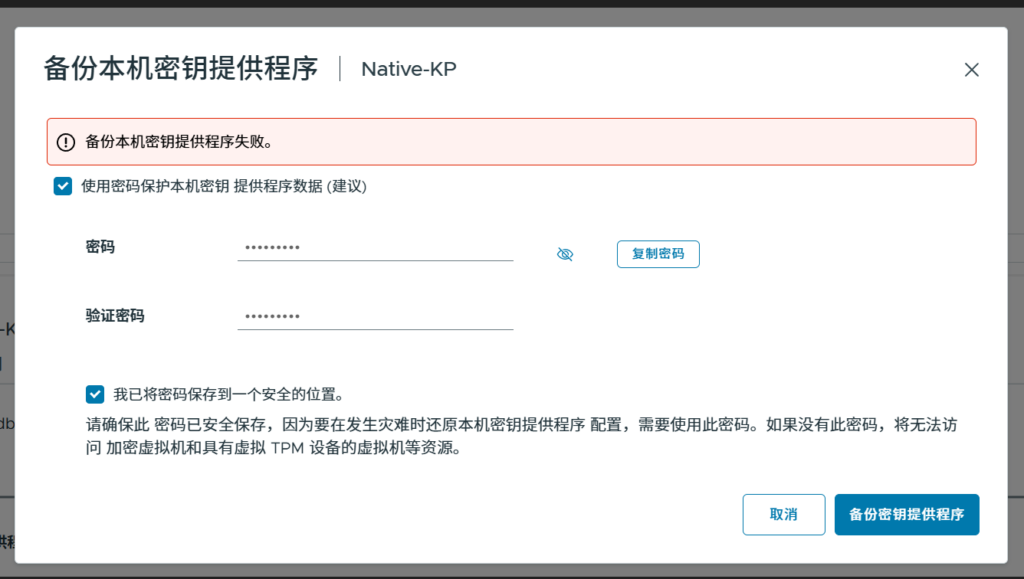
解决方案是用命令把hostname改成Vcenter的IP地址。
参考:
u/BlackCodeDe 必须这么做。就我而言,没有 DNS 服务器,我安装 vCenter 时 DNS 设置为127.0.0.1,并且主机名 = vCenter 服务器的 IP 地址。安装完成后,如果你通过 vCenter CLI 使用命令 “/usr/lib/vmware-vmafd//bin/vmafd-cli get-pnid –server-name localhost” 检查 PNID,你会看到主机名是服务器的 IP 地址,但如果你使用 VAMI 配置命令 “/opt/vmware/share/vami/vami_config_net” 并使用选项 0 提取信息,你会看到主机名显示 localhost。
对我来说,解决方法是在 VAMI 配置实用程序中运行选项 3,并将主机名设置为机器的 IP 地址,以匹配 PNID。这样做之后,我就可以通过 vSphere 和 PowerCLI 下载 Native Key Provider (NKP) 了。
这里要先启用vCenter的的ssh
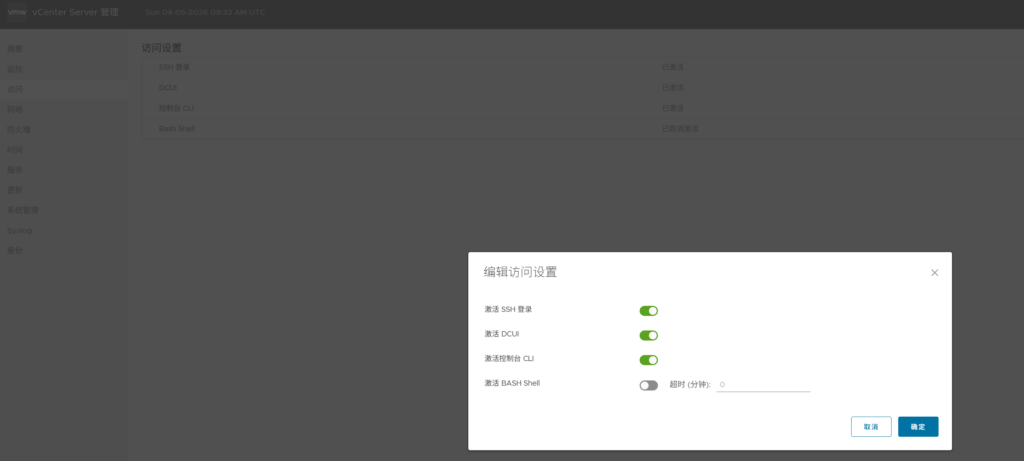
这里输入shell才能输入以下密令
Command> /usr/lib/vmware-vmafd//bin/vmafd-cli get-pnid --server-name localhost
Unknown command: `/usr/lib/vmware-vmafd//bin/vmafd-cli'
Command> shell
Shell access is granted to root
root@localhost [ ~ ]#
root@localhost [ ~ ]# /usr/lib/vmware-vmafd//bin/vmafd-cli get-pnid --server-name localhost
192.168.2.110
root@localhost [ ~ ]# /opt/vmware/share/vami/vami_config_net
没改之前查看hostname是localhost
root@localhost [ ~ ]# /opt/vmware/share/vami/vami_config_net

 Main Menu

0)	Show Current Configuration (scroll with Shift-PgUp/PgDown)
1)	Exit this program
2)	Default Gateway
3)	Hostname
4)	DNS
5)	Proxy Server
6)	IP Address Allocation for eth0
Enter a menu number [0]: 0

Network Configuration for eth0
IPv4 Address:	192.168.2.110
Netmask:	255.255.255.0
IPv6 Address:
Prefix:

Global Configuration
IPv4 Gateway:	192.168.2.1
IPv6 Gateway:
Hostname:	localhost
DNS Servers:	127.0.0.1, 192.168.2.1
Domain Name:
Search Path:	.
Proxy Server:
更改hostname
0)	Show Current Configuration (scroll with Shift-PgUp/PgDown)
1)	Exit this program
2)	Default Gateway
3)	Hostname
4)	DNS
5)	Proxy Server
6)	IP Address Allocation for eth0
Enter a menu number [0]: 3

Warning: if any of the interfaces for this VM use DHCP,
the Hostname, DNS, and Gateway parameters will be
overwritten by information from the DHCP server.

Type Ctrl-C to go back to the Main Menu

New hostname [localhost]: 192.168.2.110
== set_ipv4 ==
DEFULT_INT: eth0
DEFAULT_IPV4: 192.168.2.110
HN: 192
DN: 168.2.110
==============

== set_ipv6 ==
DEFULT_INT: eth0
DEFAULT_IPV6:
HN: 192
DN: 168.2.110
==============

Host name has been set to 192.168.2.110

 Main Menu

0)	Show Current Configuration (scroll with Shift-PgUp/PgDown)
1)	Exit this program
2)	Default Gateway
3)	Hostname
4)	DNS
5)	Proxy Server
6)	IP Address Allocation for eth0
Enter a menu number [0]: 0

Network Configuration for eth0
IPv4 Address:	192.168.2.110
Netmask:	255.255.255.0
IPv6 Address:
Prefix:

Global Configuration
IPv4 Gateway:	192.168.2.1
IPv6 Gateway:
Hostname:	192.168.2.110
DNS Servers:	127.0.0.1, 192.168.2.1
Domain Name:
Search Path:	.
Proxy Server:
更改成功之后,密钥备份成功了